The Shadows/Highlights Adjustment tool in Photoshop
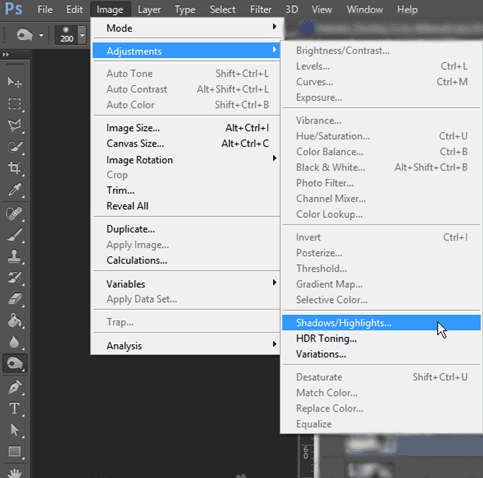
The Shadow/Highlight command is one method for correcting photos with dark or dull images due to strong backlighting or correcting subjects that have been slightly washed out.The adjustment can also be used for brightening areas of shadow in an otherwise well lit image. The Shadow/Highlight adjustment that we are going to use is destructive in nature. So it’s better first to create a duplicate layer and then proceed. So press Ctrl+J/Cmd+J to duplicate your layer. Now go to Image > Adjustment > Shadow/Highlight.
The Shadows / Highlights tool in Photoshop
Now go to Image > Adjustment > Shadow/Highlight.
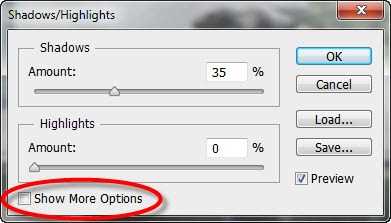
After clicking on Shadow / Highlights a new popup box will open which is loaded with two sliders i.e. Shadow and Highlight. To reveal more features, click on Show More.
After clicking on Show More option your panel should look like this.
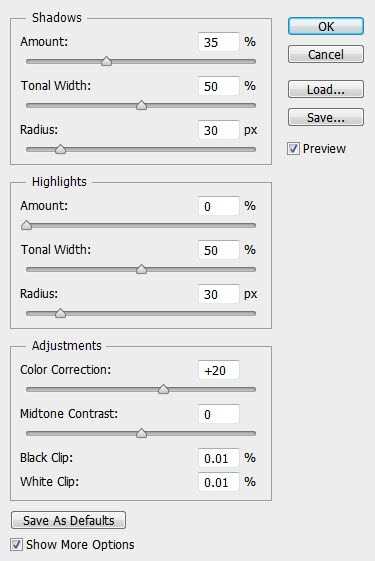
The panel is divides in three sections:
1) shadows
2) highlights
3) adjustments
Each section has some options to finetune the settings.
The shadows palet
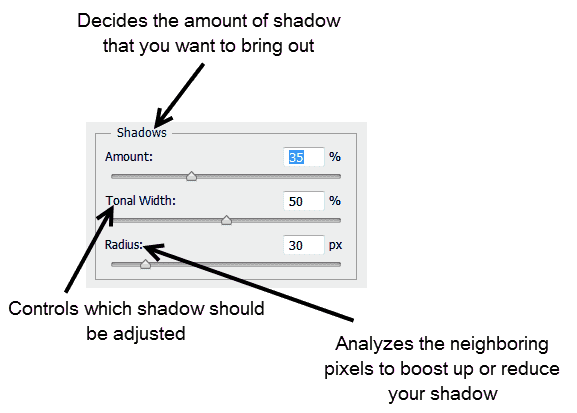
The shadows palet is divided in the sections amount, tonal width and radius.
Amount
- It decides the amount of the shadow that you want to bring out in an image.
- By default it’s value will be 35. But you can increase it to bring out more details in your shadow or vice versa.
- Ideal range is 10-40%. Above that you’ll see the formation of grains and below that I think it’s too low. Anyway this setting changes from images to images.
Tonal Width
- It decides which shadow should be bring out.
- By default its value is 50%. But again you can increase it or decrease it.
- If you set your value below 50% then darker shadow will start to become brighter and vice verse. It acts as a threshold where above the threshold something will respond.
- Ideals range is 50%.
Radius
- It decides the shadow present in your image by analyzing the neighboring pixels.
- The more the radius, the more pixels it will analyze.
- For a picture that is 16 MP camera, radius of 200-250 pixels will be ideal.
The highlights palet
The highlights is divided in the same 3 sections as the shadows palet, i.e. amount, tonal width and radius.
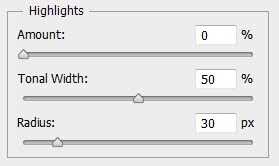
Amount
- It decides the amount of the highlights that you want to bring out in an image.
- By default it’s value will be 0. But you can increase it to bring out more details in your highlight.
- Ideal range is 10-15%. Anyway this setting changes from images to images.
Tonal Width
- It decides which highlight should be bring out.
- By default its value is 50%. But again you can increase it or decrease it.
- If you set your value below 50% then lighter highlight will start to become darker and vice verse. It acts as a threshold where above the threshold something will respond.
- Ideals range is 50%.
Radius
- It decides the highlights present in your image by analyzing the neighboring pixels.
- More the radius, more pixels it will analyze.
- For a picture that is 16 MP camera, radius of 200-250 pixels will be ideal.
Adjustments palet
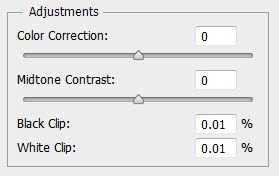
In the adjustmenst palet you can finetune color, midtones, black and white clips.
Color Correction
- It acts as a hue/saturation adjustment layer but in very different manner.
- It only changes the hue of the shadow and highlights.
- Leave it’s value as 0 until and unless you are a professional photographer who knows much more about color management in an image.
Midtone Contrast
- Deals with the contrast in an image.
- Make dark pixels darker and light pixels lighter.
Black Clip
- It increases the black in your image i.e. if you set it’s value as 1% then the black color in your image intensifies.
- If you have used Lightroom 4 before then this function is similar to ‘Blacks’.
Witgrens (White Clip)
- It increases white in your image i.e. if you set it’s value as 1% then the white color in your image intensifies.
- If you have used Lightroom 4 before then this function is similar to ‘Whites’.
The result
Below you can see what results you could achieve by using the Shadows / Highlights tool in Photoshop.

Interested in knowing more about bit depth or high end image editing?
The image editing experts of our Image Studio are happy to help. Please call +31 168 476 144 or send us an email.
